Monday, August 10, 2009

Northend Beasts

Let's do this.


Quick Explanation: A 3 Fight Gauntlet. Healers bring your flasks of mojo! Tanks need to bring stam trinkets. Dps needs to do at least 3k or don't bother.


Video:


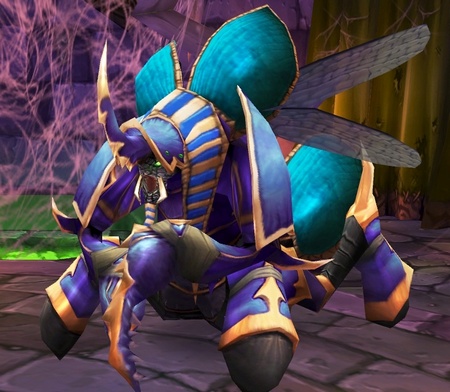
Boss 1: Gormok (Tank and Spank with adds)

Roles:
Tanks need to taunt off of each other to avoid stacks of impale (3-4) would be reasonable.

Dps and Heals need to spread out and AVOID THE FIRE (seriously, this is 90% of boss fights...if you can't do this yet...)

DPS needs to kill the adds and protect the healers

Tricks:
Healers should get out their mp5/spirit gear and use flask of mojo
DISARM (let's get a rogue for god's sake)
Coordinate switches to make it easy on healers
Fire Resist Aura/Totem
Hand of Protection on Tank when he drops the boss

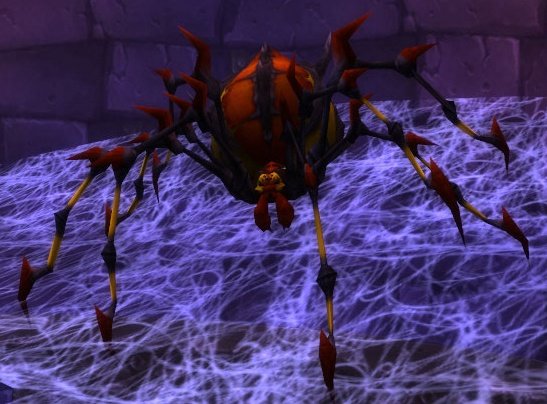
Boss 2: Acidmaw and Dreadscale (Coordinated Movement Fight)
The acid one applies poison, the dread does a fire debuff. Dread appears on right at first and can move, Acid is on left and is stationary. Each time they burrow, they switch who can move and who can't. The acid one applies a toxin that can only be removed by going to the the raid member effected by the Dread's fire debuff.

Roles:
TANKS: Each Tank grabs a boss. When Acid is mobile, he needs to be kited out of the poison he drops, much like globulus. Also, when acid is mobile, Dread will randomly pick a raid member to put on fire debuff. Other raid members need to move away from that person and heal him/her.
When Dread is mobile, he needs to be kited, as he will also drop poison clouds. During this phase, only the tank will have the fire debuff. Also, the stationary Acid will randomly apply a paralyzing toxic. THE PARALYZING TOXIC CAN ONLY BE REMOVED BY TICKING DAMAGE FROM FIRE DEBUFF (SOMETIMES THE DREAD TANK AND SOMETIMES A RANDOM RAID MEMBER)

DPS: Stay out of trouble and read last line of Tank role. Kill Acidmaw first.

Healers: Stay out of trouble and read last line of Tank role. Unfortunately, damage will be somewhat random and depend on a DPSers or healers level of incompetence....=) Dread will enrage when his friend dies and Dread tank will then require loads of healing.

Tips:
Nature and Fire Resistance
Spread Out
Face Bosses away from raid

Boss 3: Icehowl (WATCH THE VIDEO)
Quick 10Ton Hammer Explanation (Best I read):

"Icehowl Strategy

Icehowl is picked up and tanked by a single tank when he enters the room. He will occasionally stun the tank, and throw players away from him. When this happens, move back into position and continue the fight. Players do need to spread out around Icehowl however and not simply stack behind so that when uses his frost breath attack, it does not hit too many players.

When frost breath occurs, healers need to keep players alive until he stops casting it. This can be done best with AoE or HOT heals. Also anyone hit by the attack should attempt to minimize incoming damage using abilities or to get out of it with abilities like Divine Shield or Blink.

The main part of this fight, however, is Icehowl’s charge attack. When players are flung to the wall they will be stunned for a second while he jumps to the center and targets someone. You will get a brief second to see the announcement of who he is targeting before he charges at that player. That player, and anyone else near them, must quickly move away to the side or be crushed against the wall and die. If he does hit someone with this charge, he will enrage and cause significantly more damage. If he does enrage, either a hunter or rogue can remove the enrage through the use of Tranquilizing shot or Anethetic Poison.

If players successfully avoid the charge, he will be stunned against the wall and suffer additional damage for a short time. If this happens repeatedly, the fight becomes what feels like the most simple part of the Northrend Beasts encounter. You simply need to tank and DPS him while he is active, avoid the charge, rinse and repeat. I am sure the healers don’t think this phase is so, simply due to the large damage he can inflict on the tank and to players hit by his frost breath, but it shouldn’t be that bad with Ulduar geared players."

Recap: EVERYONE NEEDS TO UNDERSTAND WHEN TO GET AWAY

Tanks: only 1 tank required, the other is back up

DPS: Your main role is to stay out of trouble. Spread out and get out of the of his charge.

Heals: Pain the ass to heal as people will die no matter what you do if they're dumb.

Tips:

Frost Resist Totem/Aura

Blink, Warlock port, Timed Cooldowns, and even Divine Shield can be the difference between success and failure on this fight.

If he does enrage by hitting someone on wall, tranquil shot


Thursday, July 16, 2009

Boring DK Dps Guide (pre 3.2)

I offered to help a member raise his dps, so instead of trying to whisper information in a confusing manner, I thought it'd be better to just make a post here to make it accessible to all. I don't know everything, but I have spent a lot of time researching and experimenting with dk dps. If you have any questions/comments/suggestions/insults, please let me know. This guide is divided into 2 sections: Preparing for the Fight and Fighting. I did spend some time on this, so it'd be nice to see at least one person actually read it.

Preparing for the Fight

Speccing

Blood
There is one blood spec and here it is
http://www.wowarmory.com/talent-calc.xml?cid=6&tal=23050205300033132310230013500000000000000000000000000000230230302003200000000000000000

There are only 2 options for blood spec: either mark of blood or vampiric blood and either Dancing Rune Weapon (DRW) or Unholy Blight. I prefer blight, but for pure single target dps, DRW is better if glyphed and used properly.

Blood suffers in aoe (with unholy blight it's about equal) but excels in single target. You need about 5% armor penetration from gear to see this build shine.

Unholy

I would recommend unholy for most dk's. Unholy has the highest dps if your ebon plague is up...by a good deal. THe problem is that only one dk in the raid can have their ebon plague apply.

Here is the cookie cutter build (you must have these points):
http://www.wowarmory.com/talent-calc.xml?cid=6&tal=23050000000000000000000000000000000000000000000000000000230200332003215203140003133151

This leaves you 8 points to do with as you please. Most grab 2 handed weapon specialization and Dark Conviction in Blood. A black ice build in Frost is also possible.

Frost

I am currently specced frost and use this build: Xannatos

Of the 3 specs, frost has the lowest single target dps and actually cheats by inflating its numbers with big aoe bursts. On patchwerk, the build will be disapointing, but on most fights it will be pretty impressive. There are perhaps 3-4 encounters in naxx and ulduar combined that do not have aoe adds of some sort, not to mention the trash.


Gearing
Compared to other melee classes, dk gearing is relatively simple. You want to stack hit until capped (8%) and then just stack attack power. Always use strength gems/enchants over attack power ones because of Blessings of Kings. DO NOT GEM CRIT. Only gem crit if you are hit capped and need to fill a yellow socket. In which case use the str-crit orange gem. Even then, it might be better to use expertise gems if you're pushing 5k attack power buffed. Also, stay away from haste as much as possible. It is one of the worst melee stats. For frost especially, it is terribad. I shouldn't have to say this, but NO SPELLPOWER PLEASE.

As for secondary stats (those other stats at the bottom of gear, not gemmed stats), armor penetration is a HUGE dps boost for blood, but doesn't do much for frost and unholy. For frost and unholy, you might as stick with crit.

For gear decisions, use this guide from Elitist Jerks. It is outdated (3.08), but probably still relevant

Stat (rating) Unholy Blood Frost
1 AP 1.0000 1.0000 1.0000
1STR 2.4847 2.5570 2.3650
1HIT 2.4748 2.6609 2.4046
1APR 0.5447 1.0456 0.7628
1EXP 1.3914 1.7023 1.2453
1CRT 1.1240 1.1453 1.1894
1HASTE0.6214 0.5640 0.4978


Glyphs

Minor:
Pestilence
Raise Dead
Horn of Winter

Major:

Blood
Death Strike
Glyph of Dark Death or Glyph of Disease
DRW or Unholy Blight depending on spec

Unholy
Unholy Blight
Scourge Strike
Glyph of Disease, Glyph of Dark Death, or Glyph of Ghoul

Frost
Frost Strike
Obliterate
Disease (There is a frost fever only rotation that uses howling blast to apply frost fever. In this case, you would use glyph of howling blast. The advantage of this build is that you would never have to use pestilence or icy touch or plagues strike...just howling blast, obliterate, frost strike. This is only a theoretical style concocted by my brother and I have never attempted it)

Fighting

(1st of all, keep horn of winter up...on every cooldown..always)

Unless you can't get through a rotation because the mobs have little hit points, DO NOT START WITH DEATH AND DECAY. I know it's tempting, but don't do it. Also, don't use blood boil. It's a serious dps drop and gives you unneeded aggro.


Being a good dk dpser is about 2 things:
1. Knowing your specs rotation
2. Knowing the priority of abilities

1. Each spec has its rotation used to maximize it's big hitters. Blood has the sloppiest rotation, frost is the tightest, and unholy is somewhere in between.
-Blood Rotation: Death Strike (DS)> Icy Touch (IT)> Plague Strike (PS)>Heart Strike (HS)>HS>DS>HS>HS>HS>HS
The goal here is to be hitting with heart strike with diseases on as much as possible. Death strikes give you dead runes and gives you abominable might. The above rotation is sloppy because there is down time and diseases will expire, requiring you to use death runes to put IT and PS back on. I would only recommend blood for somewhat advanced players.

Unholy Rotation: IT>PS>Blood Strike (BS)>BS>Scourge Strike (SS)>SS>SS>SS
This rotation is very strong because with SS glyph, you can go the entire fight without reapplying diseases.

Frost Rotation: IT>PS>BS>BS>Obliterate (or howling blast if multipe mobs)>Obliterate....dump frost strikes whenever possible...reapply diseases as needed

2. Priorities
Blood: Your goal is to hit with heart strike as many times as possible with both diseases up. Using death strikes early converts runes to death runes allowing you to do more HS over a period of time.

Unholy: your goal is to hit with scourge strikes as many times as possible with both diseases up. Using Blood Strikes early converts runes to death runes allowing you to do more SS over a period of time. Once you get this rotation going, you may not have to reapply diseases for a good amount of time, allowing you to do extra SS.

Frost: Your biggest hitter is frost strike. But obliterates do a lot damage and howling blasts rack up huge aoe numbers. You want to use those 3 abilities as often as possible. Always have at least frost fever up and never let your runic power fill up (always frost strike dump). Use blood strikes early for more obliterates/howling blasts in the long-run. Keep icy talons up with icy touch (or howling blast with glyph)

Websites
This is a limited guide. For more info, wisp me (Xannatos or Tecumsehh) or go to Elitist Jerks, Wow Forums, or Deathknight.info.

Tuesday, December 23, 2008

Naxx Strategies

Arachnid Quarter


Anub'Rekhan: There is a complicated, highly coordinated way to do this and a more simple, healing intensive way to do this. Since, I'm a healer, I've chosen the latter.

ABILITIES:
Impale-This is an area of effect ability that targets a random player and hits everyone in a straight line between Anub'Rekhan and the player. It will do 4813 to 6187 physical damage and launch the affected players high in the air, causing 50% fall damage when they hit the ground.

LOCUST SWARM: Every 70-120 seconds, Anub'Rekhan casts a spell that causes AoE damage in a wide radius (30 yards) around him (the AoE remains centered on Anub'Rekhan as he moves), he will also slow to 75% of normal run speed. Remaining in the radius of effect will cause a DoT debuff to stack repeatedly dealing 875 to 1125 nature damage every 2 seconds per stack as well as silencing those afflicted. When he casts this spell, a Crypt Guard will also spawn at his initial engage point. Lasts 16 seconds.

NOTE: The Locust Swarm attack has an approximately 90 second cooldown, however the first cast is not at a set time, between 80 seconds and 2 minutes. As well, the Locust Swarm is not a normal silence. Unlike a normal silence, it prevents the use of all abilities (even auto-attack). This means that the MT cannot use Shield Wall or Last Stand to save himself if he gets stacked too high. Items, however, are still able to be used.

Summon Corpse Scarab: Whenever there is a corpse in the room (either a player or a Crypt Guard) Anub'Rekhan may decide to spawn corpse scarabs from it. This is not on a set timer. Ten will be spawned from a Crypt Guard and Five from a player. They spawn with threat on random players and will spread out and attack random targets.

Additional Adds: One of these adds will spawn after every Locust Swarm. In addition, one spawns approximately twenty seconds after Anub'Rekhan is pulled. They have around 234,000 health. They have a cleave, a stacking acid spit DoT that ticks for 500 a stack, and a low-hp frenzy that increases damage by 50% and attack speed by 60%.


Strategy:The tank needs to stay put and take the full damage of the swarm while the healers spam heals on him. This is entirely possible and will make the fight more of a tank and spank with extra healing on the swarm. Death knights are good tanks for this tactic because they can time their damage reduction ability with the swarm and take less damage. Tanks simply have to make sure that they use their damage reduction ability before the swarm because it silences them.

Once you enter the area where Anub'Rekhan is located have a hunter misdirect (if available) onto the main tank and pull the boss to the actual entrance doorway area and tank it there whilst the rest of the raid runs forward and splits into a semi circle roughly in the center of the room. Have your secondary tank behind everyone where the adds spawn. All ranged DPS should spread around like usual to avoid the impale. The offtank can add some DPS or even some offhealing to the party but needs to make sure that he stays ready to pick up the adds that will spawn in the back, as the add can easily one-shot a cloth wearer. Once the add spawns and the offtank picks it up, all the DPS has to do is simply turn around and burn it down. When the Corpse Scarabs spawn, they just turn around again, then again turn back to the boss. This tactic is meant to reduce any kind of confusion in the kiting method so separating the boss and the add makes the fight really simple. Remember that this method will only really work if your healers keep the main tank topped up, especially during the locust swarm. Any offhealers such as shamans or paladins present during the locust swarm should help to keep the main tank alive.

Remember that the tank will take massive damage at the end of the swarm so extra healing from a third or fourth healer is always good to have.

If we can't heal this we'll go to Plan B which includes kiting the boss during locust swarm.

Monday, December 22, 2008

Grand Widow Faerlina


This fight looks kind of fun. It will be dependent on the tank being very aware of what's going on and dps switching targets at exactly the right time.

ABILITIES

Poison Bolt Volley: This will hit the three closest players to Grand Widow Faerlina, used every on average every 12 to 15 seconds, but sometimes with as little as seven or eight seconds between casts. Deals 2625 to 3375 Nature damage and applies a dot that does 1480 to 1720 Nature damage every 2 seconds for eight seconds. Dispellable. Widow's Embrace prevents the use of this ability for 30 seconds.

Rain of Fire: Random Rains of Fire will be cast on players throughout the fight, at intervals of anywhere from six to eighteen seconds. 1750 to 2750 Fire damage every two seconds. Rain of Fire lasts six seconds. 8 yard radius.

MOST IMPORTANT SINCE IT WILL CAUSE WIPE: Frenzy: This will be used approximately every 60–80 seconds. It will increase Grand Widow Faerlina's physical damage by 150%, her melee haste by 50% and her size by 50%. During it she will hit the tank for upwards of 15,000 damage. Widow's Embrace, caused by killing a worshipper, dispels and prevents the use of this ability for 60 seconds.

Strategy:
You will need two tanks. Worshippers should be clearly marked and DPS should know exactly what the kill order is. One tank will pick up the worshippers and offtank them right under the stairs on the left side. Any tank class is good at tanking them, as they don't deal high loads of damage. The main tank will pick up Faerlina after the OT pulls the rest and drag her to the middle of the room where everyone will spread out around her. Every DPS should focus ONLY in Faerlina, ignoring the four adds till the enrage phase is near.

The off-tank will pick all four adds, and start DPSing one of them: the one who must be killed in order to stop Faerlina's Frenzy.

When the frenzy is about to come off cooldown (10 secs or so) every DPS should stop all DPS and switch target to the worshipper marked to kill. Do not start attacking it, just target it and be in range for attacks. The main tank should go where the OT is, the closer the better, taking Faerlina with him. The Offtank should have lowered the worshipper's health to 15% or less. If the OT is doing more damage than that and actually close to killing the adds, he should just sit there and stop doing any damage.

When the enrage is up, all DPS should burst their CD to insta-kill the worshipper. If done properly Faerlina's enrage should fade, and MT can move Faerlina back to the center of the room, where DPS can resume on her.

Rinse & Repeat every time the enrage timer is close.


Maexxna


Tank and Spank with lots of adds, sleeps, and aoe. 2 Dps needed to take down the webbings from web wrap.

ABILITIES

Web Wrap: Cast at the 20 second mark, and then every 40 seconds after that. Sends one player flying towards the webs on the Western side of the wall, encasing them in a cocoon and incapacitating them. This ability sends the player to the same place all the time, and therefore positioning the DPS where the cocoons will spawn makes for much easier destruction of the cocoon. When encased, 2475 to 3025 Nature damage is done every 2 seconds. The cocoon, which is called "Web Wrap" and has about 6,000 health, can be destroyed from the outside.

Web Spray: Cast every 40 seconds incapacitating everyone in the room including the tank for 6 seconds, dealing 1750 to 2250 Nature damage. This ability cannot be resisted, and the only way to avoid it is to be dead.

Poison Shock: Inflicts 3500 to 4500 Nature damage in a 15 yard frontal cone in front of Maexxna every 10 seconds.

Necrotic Poison: Reduces healing taken by 90% for 30 seconds. This needs to be cleansed immediately, preferably with a shaman totem. Applied to targets in melee range in front of Maexxna, generally the tank.

Frenzy: At 30% health, Maexxna will go into a killing frenzy that cannot be removed. Increases physical damage by 50%, melee haste by 50% and size by 15%.

Spiderlings: 8 Small spiders are spawned at the 30 second mark, and then every 40 seconds after that. These hit for about 1,000 on cloth and have about 7,300 HP.

Strategy: Before the encounter begins have your raid move into the lair to the southwest side (left for the directionally challenged). In front of you will be the boss and a rectangular column poking through the web. Your tank will engage Maexxna at the protruding column while your ranged DPS and healers set up to the west. If you have a mage it is beneficial to have them down with the melee to Frost Nova the spiders when they are summoned and then AOE them down. When someone is in Web Wrap they will be flung to one of two spots on the western wall. Designate two ranged DPS to destroy the webbing in case one of them gets wrapped. Once Maexxna is down to 33% health, stop DPS and wait for a Web Spray. After that is done, blow all your cooldowns and enjoy the DPS race. Healers must keep the Main Tank at full health and use HoTs in case your DPS is unable to bring down the boss. A good tip for warrior tanks is to use Shield block every Web Spray, the cooldowns line up well and it really helps the healers.